Social Media

Follow me on Tumblr' Follow me on Pinterest Follow me on Twitter Follow me on Instagram Subscribe to RSS
Showing posts with label Nails. Show all posts

Friday, 25 April 2014

March Beauty Favourites


I am way behind with my posts for this month trying to balance work and constantly working evening, I try to spend what little spare time I have with my little family...my little one is so chatty and full of personality these days so I try not to miss anything! There are so many things I've been getting good use out of recently so here are my favourite beauty products for the month of March.


The Body Shop Strawberry Body Polish
£5.00(75ml) or £10.00(200ml) from The Body Shop here.
When I'm doing the whole full wack body exfoliating, shaving shebang, I tend to use a seperate body exfoliator and then follow up with a shaving foam or shower gel so I have a good lather to work with. This not only exfoliates but it lathers up as well which is brilliant and saves time using additional products. It smells beautiful of course, it isn't too harsh and leaves my skin feeling really soft.
La Roche-Posay Effaclar Purifying Foaming Gel
£9.75(200ml) from Escentual here.
I've been in urgent need of a cleanser suited to current skincare concerns and this always does the trick. It makes my skin feel so lovely and clean, it doesn't irritate my face at all and as it doesn't contain soap I never experience any dryness after using.
L'oreal Skin Perfection 15 Second Miracle Cleansing Oil 
£6.79(150ml) from Feel Unique Here or Boots.
Cleansing oils have slowly become my go to product to remove make-up as I tend to wear quite a thick foundation base and I have found that oil breaks up my make-up the easiest. I had previously just used my DHC Cleansing Oil sample but spotted this in Boots on offer and thought I would give it a whirl. I massage two pumps of this into my skin and it gets rid of everything.
No7. Total Renewal Micro-dermabrasion Exfoliator
£11.50(150ml) from Boots here.
Doing a bit of research on the best exfoliators out there, I came across this several times and decided to grab it whilst I had a voucher to use. I haven't really used a face exfoliator for ages now and generally just relied on flannel or my Clarisonic Mia to exfoliate. This product is well worth trying out, it leaves my skin feeling super smooth and I think it has reduced the redness of my acne scarring to some extent
ELF Studio Makeup Mist & Set
£3.95(60ml) from ELF here.
This little beaut had been gathering dust for some reason in my dressing table drawer when I had a lightbulb moment one day and ended up rediscovering just what an amazing little budget buy this is. I have been using quite a thick foundation recently in the form of the Rimmel Lasting Finish Foundation which can sometimes make me look a little cakey. A few spritz' of the ELF setting spray on my face and my make-up magically appears seamlessly blended in with not a trace of the dreaded cake face in sight.


Blink+Go Eyeshadow and Blush Pallette
I've found myself reaching for this soooo much recently, the shades are beautifully soft and the pigmentation is spot on. Unfortunately this palette has been discontinued now, which is such a shame as I particularly love the khaki and brown eyeshadow shades as they create a not too OTT smokey eye for the daytime.
Rimmel Moisture Renew Lipstick in Notting Hill Nude
£6.49(150ml) from Feel Unique here or Boots.
This is my fail safe lip colour - swatches and review here - for when I don't feel like being adventurous (that would be most of the time) and it lasts for a pretty decent amount of time. It doesn't hurt that I love the tacky purple packaging although I think the newest formula is in a slightly more modern looking tube. A great budget beauty buy nonetheless for ladies who love lipstick.
Nails Inc. Elizabeth Street  Nail Polish
£11.00(10ml) from Look Fantastic here.
I love a good pink nail manicure and this is one of my favourite baby pink polishes. The formula is awesome, the longevity is good with Seche Vite top coat applied over and it's just such a pretty colour.

Wednesday, 5 March 2014

My Top 5 Nail Polishes...At This Moment In Time

Since starting up my blog, my addiction to switching up my nails every other day has definitely waned, to the point where I've finally succumbed to the reality that I need to get rid of some polishes. In a vain attempt at condensing my little collection down, it ultimately ended with me getting slightly overexcited at all the pretty but sadly unloved colours and swatching everything to my little hearts content. Despite this serious setback, I eventually whittled down my stash and came to the conclusion that really, I could probably survive with just a few polishes, maybe 6 or 7...okay at least 25, JUST in case.

https://blogger.googleusercontent.com/img/b/R29vZ2xl/AVvXsEhzsg64tcJfEqDHMhpIl-2OqyfIV53GPxP7BpY2n5mG1FBQNHuxVLqlNeeOPhHLGXRTE3KHOph1HILwKqpLIsB_QjSlOEfg4uHWteFQq3aUFZB3l3Rnwg17tP6fzR07MBQjS4JJPIJn2d_c/s1600/DSCN2307X.png
Image Source: Like a Candy Shop

Nowadays, I do tend to play it safe with my nails by sticking to shades I love and that I know suit me but the babies pictured are the ones that are without a doubt, my most loved and used colours.

L-R: Models Own Beth's Blue, Models Own Pastel Pink, Barry M Peach Melba, Barry M Gelly Lychee and Models Own Nude Beige.
I know there isn't a huge variety of brands in there and that's not to say I don't like other brands. I just happen to own a lot of Models Own and Barry M polishes but admittedly, I do absolutely love Models Own...there kinda bang on for price and formula whereas Barry M can sometimes be a bit more inconsistent. I just find that with SOME of the Barry M colours, I have to paint 3 coats and to be completely honest, I simply cannot be bothered with that kind of faff considering I often have a limited window of time to do my nails, between putting a toddler in bed and doing housewifely stuff. Overall though I really like the Barry M range and the shades featured here usually do the trick in 2 coats.

Remember, it's good to share so comment away with your favourites.


Thursday, 12 January 2012

NOTD: Peachy Floral

If you read my blog you may have noticed over the past few days, my layout has been going through a bit of an identity crisis but finally I have a new blog design and I'm pretty happy with it...for the time being ;-) So, to commemorate I thought I'd do not one but two NOTD's in honour of my girly new layout!

Photo taken in natural daylight, apologies for the lack of focus!
 First of all, sorry for the mess around my cuticles and pinky finger. I was rushing slightly as I'd just found my camera and sunset was rapidly approaching. Any bloggers reading this will understand how much of a nuisance it is having to make sure you take photos before daylight has started to fade :-\

Taken with flash.
Taken with flash.
 So as you can see, I've kept my first NOTD quite simple. For the flower detail on the ring finger I used a floral nail sticker that I received as a free gift with a China Glaze nail polish I purchased off eBay. For the base colour I've used Barry M nail polish in Peach Melba which I previously swatched here and featured in my favourites for 2011.

Taken in natural daylight.

Taken with flash.
 As you can see, I went a bit crazier with this hand! For this design I used my old but always reliable Collection 2000 nail polish in Ebony to stamp on a design taken from one of the fauxnaud monster bundle plates I posted about a few months back.

Top L-R: Maybelline Salon Manicure Base Coat, Barry M Nail Polish in Peach Melba, Collection 2000 Nail Polish in Ebony and Seche Vite Dry Fast Top Coat. Bottom L-R: Nail Art Stickers and Monster Bundle Plate (Design used is on the left of the plate).
 Hope you enjoyed this post, if you've any questions at all or just want a chatter please drop me a comment in the box below :-)


Friday, 6 January 2012

NOTD: Avon Sequinned Turquoise

I didn't actually go out for New Years Eve but despite staying in I kinda pretended I was going out and got all done up (sad I know!!) which obviously meant I had to do something with my naked nails. I really wanted to find a use for the Avon nail polish I was bought for Christmas and thought it would be a perfect glittery colour for NYE celebrations. However when I swatched two coats on my nail wheel I didn't think the colour really suited me so I came up with the idea of layering it over a black glitter polish by W7 that I'd kinda impulse purchased when I was doing a bit of Crimbo shopping in B&M's.

And this is how it looked, I'm gonna apologise now for how untidy my nails are, I was literally only having a little experiment and didn't expect to like it so much! I'm not a big fan of blue or green nails as I really don't think either of the two colours do anything to compliment my skin tone however I really like this teal sort of shade. I know that the colour on my nails is almost identical to the colour you see in the bottle but for some reason my camera has made the bottle seem a lot darker than it actually is :S
Products used from left-right: W7 Cosmic Black, Avon Nailwear Pro in Sequinned Turquoise and Seche Vite Dry Fast Top Coat.
 As you can hopefully see in the above picture, the Avon polish is more of a turquoise colour. I used one coat of the W7 polish, then painted one coat of the turquoise over the top and finished with the Seche Vite Top Coat for a glossy finish.


Wednesday, 21 December 2011

Nail Rock Nail Wraps

I was quite happy when the November Glossybox included a full size packet of the Nail Rock Nail Wraps as I'd never actually tried applying wraps before. Despite my initial happiness at the wraps being included in the box I kind of forgot about them and they've been in the box up until the other day when I thought I'd have a bash at putting them on.


The design I was sent was the leopard print and as much as I love leopard print, I was a bit disappointed with the design I got and think I would of preferred a packet of the less fussy, monochrome striped wraps that other people received. That being said I think there a nice change and look kinda funky....

Nail wraps photo taken without flash.
Hoooowever as you can probably see in the photos, they are literally peeling off after less than a day of me having them on which is pretty crap considering Nail Rock claim these last up to 10 days! On the other hand, I'm pretty sure my technique of putting them was far from perfect which could of led to them not sticking properly in the first place. 

Nail wraps photo taken with flash (Sorry about the abundance of shadows!).

Unlike a lot of nail wraps, these don't require heat but I found that at the tips of my nails they wouldn't stick down especially around the edges where the nails naturally curve. Also, the instructions suggest filing under the nail to get rid of the excess bit of wrap....erm how is this supposed to work?! Sorry if I'm being completely stupid and if someone actually understands how to do this successfully please enlighten me!! I resorted to filing downwards at a 45° angle and I think this is exactly why they haven't lasted but I honestly don't know how I would of got rid of all of the excess wrap by filing under my nail. 

On that note, if you genuinely know how to apply these properly please feel free to comment as I would love to know the best technique to make these last. I think I would be tempted to actually purchase some in a different design if only they lasted a bit longer! 


What do you think of the whole nail wrap craze? Do you think it's a bit of a fad?


Monday, 5 December 2011

Bundle Monster Nail Art Stamping Plates

Hey everyone, hope your all having a good week so far?

When I came back from my baby honeymoon a few weeks ago, I think I may of mentioned that I was going to do a post on the Bundle Monster Nail Art Stamping Plates aka Fauxnads (Budget version of the Konad plates for those not in the know) so here it is! In a nutshell you get 25 stamping plates for £16.99 in comparison to one Konad plate costing around £5 so the attraction is pretty obvious if your a bit of a nail art junkie like me :-)


This image taken from Amazon illustrates the huuuumungous variety of plates that you get.


The images above were taken after one of my first little experiments with one of the Monster plates designs and if I do say so myself, I think there half decent....not bad but not Uhh-mazing. As you can see there are little parts where the stamp hasn't transferred onto my nail i.e. part of the stamp has stuck to the stamper although that may have been because I wasn't quick enough. I also noticed that the actual designs don't transfer onto the nail as sharp and crisp as Konad designs, if that makes sense. You see how the edges of the leaves look a tad fuzzy like I had a shaky hand when I was doing my nails?

If you have used Konad plates before you may of also noticed that these fauxnads have more designs crammed onto the plate which originally I thought was great because I'd have more designs to play with but in hindsight became a bit of a nuisance because you haven't got much space when scraping away excess polish and picking up the stamp with your stamper.

L-R: Stargazer Chrome Silver and Models Own Grey Day

I had read in a few places that it's not exactly essential that you own special Konad stamping nail polish to do nail art stamping and whilst I agree with this to some extent, I think it's a bit hit & miss with certain nail polishes. I found a great link here that details all suitable nail polishes for stamping, I would definitely recommend testing out your own as well though....it can be fun just to experiment sometimes and if it works that's great and if not, you've only wasted a minuuute amount of nail polish!


Although I think there are a few cons with these plates, all in all I think they are a worthwhile spend if you enjoy trying out new nail designs and having a little play around with nail art.


Where to buy: Amazon.co.uk


What do you think of fauxnads in comparison to the real deal?


Thursday, 17 November 2011

Konad Nail Art Stamping


Over the past few months I'd noticed more and more nail art designs using something called Konad...Intrigued, I decided to do some Googling and Youtubing and found out that in a nutshell it was almost like a cheats way of creating amazing nail art designs. Upon this discovery I decided to purchase a small Konad starter kit and a few image plates. 

And this is what I came up with on my first attempt and if I do say so myself, I was fairly impressed! Admitedly, it took a bit of trial and error to get the consistency of the polish on the stamp right but once I'd got the hang of that it was really quite easy.


This is the image plate I used and the design I used is framed with the pink dots.


I think these are actually quite Christmassy looking although that wasn't really my intentions I just loved the design and wanted to use a dark base colour that would make the white stamping polish stand out.


Sorry about the quality of the pictures, in hindsight I should of just waited till it was daylight to take photos :-\


What I Used and Where I Bought From:

Base Coat Colour: OPI You Don't Know Jacques about £9.99 from Sally Hair & Beauty (Pretty sure you could get this off somewhere like eBay or Amazon for cheaper though)

Konad Starter Kit and Image Plate M71 from http://ocnailart.com/
If your just starting up with Konad, I'd highly recommend purchasing from this website. The delivery is super fast considering it's from the US and the prices are relatively low in comparison to other Konad sellers and...they also add a little smiley face & note to your billing invoice which I liked, you may think I'm a bit sad for being excited over this I know but I think it just adds a nice little personal touch :-)


I can't wait to really go mad with my little kit and show you what I come up with! Have you tried Konad stamping and what are your fave image plates? I can't wait to sneak a few onto my Christmas wish list!!


Friday, 23 September 2011

Models Own Haul

Hey guys, if you read my blog already you may remember me posting a nail of the day a few weeks ago featuring Models Own Beth's Blue which I bought along with four other polishes when the 50% off sale was on a few weeks ago. I finally received my 2 faulty replacements yesterday so I thought I'd share what I picked up with you.

Left-Right: Beth's Blue, Pink Fizz, Champagne, Smash-Up Black and Grace Green.
L-R: Beth's Blue, Pink Fizz, Champagne, Smash-Up Black with Champagne Base and Grace Green. Two coats applied.
Polishes and swatches in natural daylight.
Polishes and swatches with flash.
 Overall, I was really pleased with what I chose as I was kind of missing an element of each colour in my collection. I didn't have a blue I really liked, no glitter, gold or green and no crackle...I know I'm really, stupidly late on the bandwagon with that last one but I'd never really been that won over by the whole crackle craze.

I personally love Models Own nail polishes because the formulas are really pigmented and generally smooth to apply. What do you think of their nail polishes and did you pick anything up when they had the 50% promo on?


Thursday, 15 September 2011

NOTD: Muted Polka Dots

Just thought I'd share another little quick and easy nail art design I'm currently rockin...so easy that I was able to do the right hand fairly quickly with my unloved left hand and no mistakes!


I know the dots aren't exactly uniform but I didn't want them to be if I'm honest, I'm more of a go with the flow kinda girl. I used a really old but surprisingly good, Collection 2000 nail polish in black and one of my fave nail polishes ever, Models Own Nude Beige.


This is pretty much all I used minus clear base and top coats, the dotting tool came in a pack of 5 from an eBay seller in China and they cost me about £2.50...you could just use the end of a hair pin but for that price I thought I may as well buy specific nail tools and you can obviously create many more designs other than simple polka dots (plus I tend to lose hair pins all the time so I don't fancy wasting them on my nails!).


 Hope you've enjoyed this post anyways, have a great week :-)


Wednesday, 14 September 2011

Easy Peasy Fruity Frenchies

I'm not a big nail art person but with so much time on my hands at the moment I've quickly become obsessed with googling all sorts of nail art designs, anyways I thought I'd have a dabble myself and share my first attempt with you :-) 

 I've seen tons of gorgeous designs using these fimo fruit pieces but as I've literally never experimented with nail art I decided to take rather small babysteps and start off with something quite basic and easy to acheive. It's not exactly a work of art what I created but I was relatively pleased considering my inexperience! If you want to know how I did this, read on :-)

Step-by-Step

1. Make sure nails are clean and filed to your desired shape, you could use nail tips if your nails are quite short or you wanted something more dramatic.
2. Paint your nails with a clear base coat.
3.Once the base coat has dried, paint the tips (white bits) of your nails with a bright, fruity colour e.g. oranges, corals and yellows would work well.
4. Once the tips have dried, put a few blobs of nail glue on the corner tip of the nail and a few blobs down the side to create almost triangular section of glue (you only want this to take up a small section of the nail..say less than a ¼ of the entire nail).
5.Using a pair of tweezers, stick on the fruit slices and hold in place for a few seconds until they feel secure.

That's it :-) You should now have a fabulously fruity french manicure! 

Here's what I used:


1. Maybelline Salon Manicure Calcium Strengthener 
Available from most drugstores but I purchased two for 99p + 80p Postage from this eBay seller - Lippy Lounge

2. ELF Nail Polish in Mango Madness 
Available from: ELF Cosmetics 

3. Elegant Touch Brush On Nail Glue 
Available from: http://www.boots.com

4. Old Pair of Eyebrow Tweezers

5. Fimo Fruit Slices 
Available from various eBay sellers for under £2.00

In hindsight, I think I would either paint the whole nail one colour or use false tips as the effect is a teeny bit lost on the length of my nails...suppose that's the nature of
learning though! 

Hope you've enjoyed this anyways :-)


Friday, 2 September 2011

NOTD: Models Own Beth's Blue


I'm a big fan of Models Own nail polishes so I was obviously quite excited when I finally received my order from the 50% sale they held a few days ago, unfortunately two of the polishes I ordered will be going back...one of the bottles had cracked and broke and this one I'm wearing is basically faulty. So now I'm guess your thinking why is this nail of the day if it's faulty weirdo?! Basically I think I got a dodgy bottle as the formula was really gloopy and applied horrible but on the other hand I absolutely LOVE this colour, I think I've finally found a blue polish that suits me!! I'd say it is more of a purpley blue tone which is probably why its not as unflattering as other blues I've tried.

Was anyone else tempted by the 50% sale and if so let me know what gems you bought! As always I appreciate any comments so feel free to drop me a comment :-)


Monday, 15 August 2011

ELF Love & Hate

Hey guys, hope your all okay? And anyone from the UK...I hope the riots haven't affected you too much :-( Sad times for our country but hopefully things are starting to settle down now...


Anyways as I mentioned in my last post, I purchased quite a large amount of E.L.F. products the other week and since I've pretty much tested everything now I thought I'd share my thoughts with you on what I got and what I loved or hated. So below is everything I bought...please don't think I'm showing off or even that I'm made of money, I tend to purchase things more when there on sale or a promotion and at the time E.L.F. were offering 50% off there entire product range! How could I resist really when it's already so cheap?!


A lot of ELF products I've bought in the past are very hit and miss so..starting off with the brushes I have to say, overall I wasn't really impressed with what I picked up...

Brushes

  • Studio Stipple Brush - this was a repurchase for me as I'd kinda ruined the one I had through being too vigorous trying to clean my Revlon Colorstay foundation off it :-\ I don't know why but its just not the same as the first one I bought?! The consistency of the bristles seems much finer and less dense than the one I already had therefore I don't think I'd get as full coverage using it to apply liquid foundation. When I tried to apply powder blusher with it, it was far too messy and not that much product ended up on the bristles.
  • Total Face Brush - I found this brush to be okay, not as soft as I thought it might be but it's got a huge surface area which is great for applying a dusting of powder.
  • Foundation Brush - Again I found this to be just okay, I bought this to apply primer with but I think my fingers do the job just as well. I've actually found its better for applying concealer but as I'm pretty much always in a rush I prefer to use my fingers to apply concealer.
  • Blushing, Bronzing And Blending Brush - I was pretty disappointed with this to be honest, don't get me wrong it does the job but before I'd even taken this out of the plastic wallet I noticed it had already shed some bristles :-\ So yeah...it already felt very fine in terms of bristle consistency. God knows what I'd have left once I'd had to finally wash it!
  • Blending Eye Brush - Not sure why but I was expecting this to be more fluffy like the Sigma E35, looking on the ELF website now I don't really know why I was expecting this! For the price however this is a good brush for blending any harsh lines in the eye crease.
  • Eyeshadow Brush -Again, not sure why but I was expecting this to be more fluffy i.e. bristles a bit softer and longer in length so I was slightly disappointed at first. However I have found that it is a really good brush for applying and blending eyeshadow in the crease and the bristles feel nice and soft.
Waffle over on the brushes front! 


Studio Blushes

Left to right: Pink Passion and Candid Coral.
 These are my first ELF blushes and I picked up the shades Pink Passion and Candid Coral. Below are swatches of both colours and for your reference I'm an NC25 in MAC so this may show up differently on paler or cooler skin tones.

Swatches left to right are Candid Coral and Pink Passion, sorry there not in the same order as the first picture!


Swatches taken in natural daylight.


Swatches taken with flash.


Personally, I love this colour and its not half as scary as the photo looks! Whilst the pigmentation is really good it's also very buildable, so really its up to you how bright or subtle you want this to look.


Firstly, sorry for how messy this looks already but I have been using this quite a bit over the past few days. I was expecting this to be a lot lighter in shade than it is but having used it now a few times I have really warmed to it. It's not as coral coloured as I'd wanted but on the other hand, I do really like the subtle rosy glow this adds to my cheeks.


 Studio Matte Lip Colours 

As soon as I saw these beauts, I was quite keen to get my hands on them and give them a try so I purchased the shades Natural and Coral.
Top to bottom: Natural and Coral
Now these actually appear a bit darker than what they do on the ELF website but I think that goes for a lot of their products if I'm honest! Despite this, I was pleasantly surprised at the pigmentation of these however they are quite creamy in texture rather than being completely matte.
Swatch of Natural taken in natural daylight.
Swatch of Natural taken with flash.

Natural turned out to be quite a rosy pink tone but I really like it, it's something I could wear everyday without feeling too out there.

Swatch of Coral taken in natural daylight.
Swatch of Coral taken with flash.
I don't think my pictures do it justice but this is a gorgeous colour! I've been reaching for it quite a lot over the past week but I'd say it's more of an orangey apricot toned coral rather than a pink toned coral.


Mineral Lipsticks
I've never been a big lipstick wearer but over the past few months I have started to build up a small collection of mainly drug store lipsticks so I purchased two lipsticks from the mineral range. I didn't want anything too out there in terms of vibrancy so I went with Nicely Nude and Natural Nymph.


Left to right: Nicely Nude and Natural Nymph
I'd recommend these lipsticks if your a bit of a lipstick virgin like myself as they are so cheap and relatively good quality. The texture is quite creamy, not too drying and pigmentation is good.

Swatch of Nicely Nude in natural daylight.
Swatch of Nicely Nude taken with flash.
 The ELF website states that Nicely Nude is a sheer warm pink with a hint of gold shimmer which I think is pretty accurate, having said that I wouldn't buy this shade again as its too close to my natural lip colour and that's not really the look I was going for!

Swatch of Natural Nymph taken in natural daylight.
Swatch of Natural Nymph taken with flash.


I tend to research nude lipsticks thoroughly before purchasing because they generally make me look dead or rather ill :\ After trying this, I'm kind of coming to the conclusion that until I get a tan I will never suit nude shades!  Having said that, it has come in handy on days when my lips look pinker/darker than normal. I'd say it's very comparable in colour to the Gosh Darling lipstick but minus the sheen as it does give quite a matte finish.

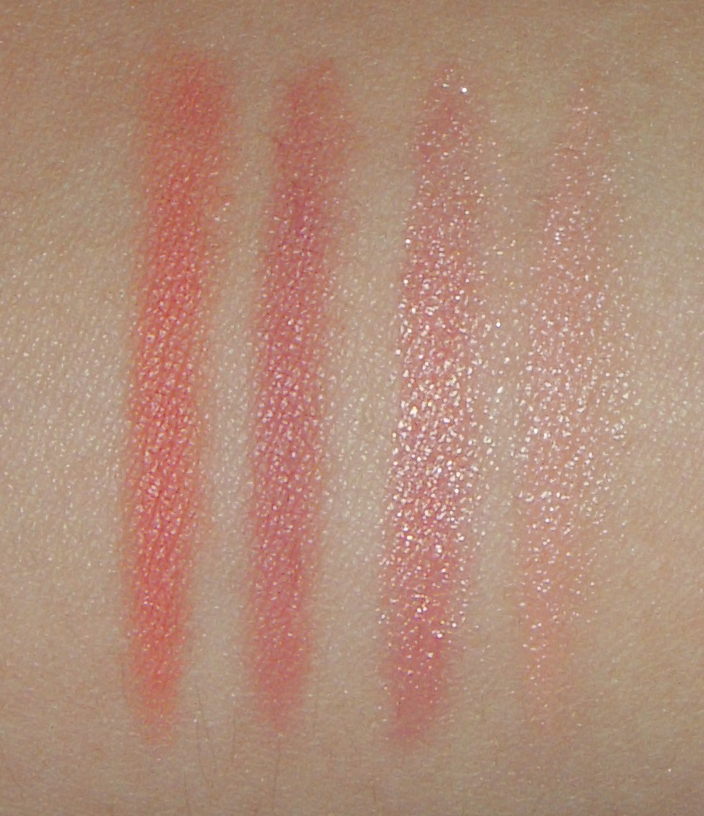
Swatches of all lip colours, L-R: Coral, Natural, Nicely Nude and Natural Nymph.

Swatches taken in natural daylight.
Swatches taken with flash.


Nail Polish
Considering these cost only £1.50 normally, I was pleasantly surprised and impressed. The formula is really good and it only took me two coats to achieve a nice even finish. My favourite of the three shades I picked up has to be Mango Madness which is quite a bright orange toned coral.
L-R: Mango Madness, Smoky Brown and Mint Cream.

Mango Madness

Mint Cream

Smoky Brown

Mango Madness

Mint Cream


Eyebrow Kit
 
Swatches taken with flash.
Swatches taken in daylight.

This is my first eyebrow kit and too be completely honest I have a sad feeling it will end up being slightly neglected :-( I have my eyebrows threaded so the shape is quite defined most of the time, I usually just have to pencil in any faint areas with my Rimmel eyebrow pencil so for me this just seems like a lot of effort. At some point I will try and incorporate this into a made up eye and show you the results...I just don't think its fair of me to review something I haven't really used yet.

...nearly there!
Face Products
  • Eyelid Primer - Basically an okay product for me. It does the job I suppose in terms of keeping eyeshadow from creasing but I don't know if that's just because of this product or because I'm using a good eye cream that doubles up as a primer on its own.
  • Studio Makeup Mist & Set - So glad I bought this!! This is my first make-up setting spray so I'm afraid I couldn't compare this to the infamous MAC Fix+ I was really impressed with how this set my make-up and made it seem like I had more of a natural glow than the reality of my face being caked in foundation. For £3.50 its definitely worth trying out if your a fixing spray virgin like me.
  • Oil Blotting Sheets - So far I'm really disappointed with these!! To be blunt they don't blot oil, I don't know if I was oilier than normal but when I tried these out my face looked just as bad after despite the sheet seemingly being covered in oil. The Professional Shine Eraser sheets that are also by ELF work much better so I'm not sure how they've got these so wrong.
  • High Definition Powder - This feels nice and lightweight over foundation, it works well at eliminating shine and creating a matte finish. I just wish it wasn't so messy! I really don't trust carrying this around in my bag as it seems to get everywhere so unfortunately I've only been using it to set make-up before going out anywhere.
  • Mineral Infused Face Primer - I'd had doubts about purchasing this as I'd read a few things about it being an oily skinned girls worst nightmare but so far I've loved this! A little definitely goes a long way as it has quite a slippery texture which makes your skin feel super smooth, I've found that it mattifies shine rather well also. Probably not the best primer for keeping oil at bay all day but definitely worth a try for £6.00 or even cheaper if you manage to grab it during a promotion period.
So that completes a rather massive review post! I really hope this helps anyone considering purchasing anything I've reviewed.
What would you recommend from the ELF range?


LinkWithin

Related Posts Plugin for WordPress, Blogger...